
How to Align Garage Door Sensors for Safe Operation
Garage door sensors are crucial for safety, and knowing how to align garage door sensors properly ensures your system works reliably and prevents accidents. These small but powerful devices ensure that your garage door operates smoothly and reliably. However, when the sensors become misaligned, they can cause frustrating issues, such as the door refusing to close, or even pose safety risks by failing to detect obstacles properly. Understanding how to align garage door sensors not only protects your family and property but also helps extend the life of your garage door system.
Garage Door Sensors: What They Are and Why Alignment Matters
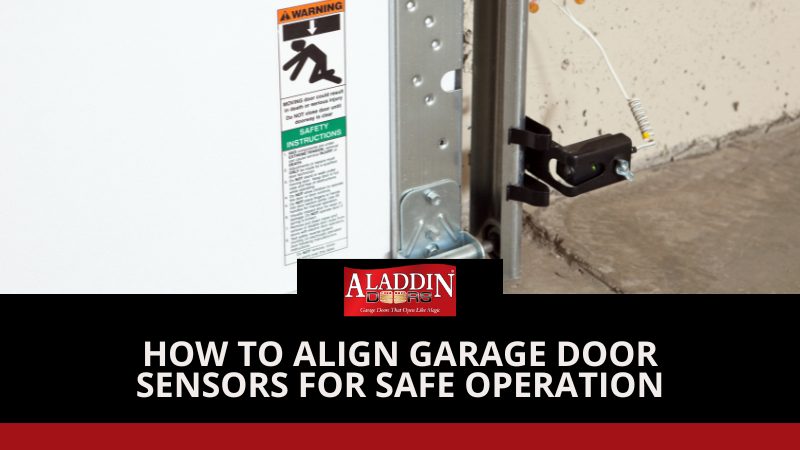
Garage door sensors are safety devices installed near the base of your garage door tracks, usually a few inches above the ground. They use an invisible beam of infrared light to detect if anything is blocking the door’s path. When the beam is interrupted, the sensors send a signal to the garage door opener, stopping or reversing the door to prevent it from closing on an object, person, or pet.
These sensors are more than just a convenience; they’re a critical safety feature. Without them, a heavy garage door could accidentally cause damage or injury. In fact, modern building codes and federal regulations require garage door openers to include these sensors to ensure safe operation. Properly working sensors not only protect your loved ones and belongings but also give you peace of mind every time you use your garage.
Common Signs Your Garage Door Sensors are Misaligned
When garage door sensors fall out of alignment, your system will usually give you clear warning signs. Recognizing these issues early can help you avoid unnecessary frustration and keep your door operating safely. Common signs of misaligned sensors include:
- Garage door won’t close properly: The door may start to close but then reverse immediately, or it may not move down at all.
- Flashing sensor lights: Most sensors have indicator lights; if one or both are blinking, it often means the beam is obstructed or the sensors are not lined up correctly.
- Door closes unpredictably: A misaligned sensor may cause your garage door to stop mid-cycle or behave inconsistently.
- Nothing is blocking the door, but it still won’t close: If the path is clear and the door won’t close, alignment is often the culprit.
- Visible tilt or shift in sensor position: If one sensor looks angled or slightly out of place, it’s likely disrupting the beam connection.
If you notice one or more of these issues, checking and realigning your garage door sensors should be your first troubleshooting step before considering more costly repairs.

Tools Needed to Align the Sensors
Before you begin adjusting your garage door sensors, it’s helpful to gather the right tools. Fortunately, you won’t need anything complicated, just a few common household items. Having these on hand will make the alignment process smoother and more efficient:
- Screwdriver: Most sensors are secured with screws that may need to be loosened and tightened during adjustment.
- Level: A small carpenter’s level helps ensure both sensors are perfectly aligned at the same height.
- Measuring tape: Useful for double-checking that both sensors are mounted the same distance from the ground.
- Soft cloth: For wiping away dust, dirt, or cobwebs that could block the sensor’s beam.
- String or laser level (optional): These can make fine-tuning alignment easier by providing a straight reference line between sensors.
Step-by-Step Guide: How to Align Garage Door Sensors Safely
Aligning garage door sensors is a straightforward task you can often handle on your own with just a few simple tools. Follow these steps to ensure your sensors are properly aligned and working safely:
- Turn off the power: For safety, disconnect power to your garage door opener before adjusting the sensors. This prevents the door from moving unexpectedly.
- Locate the sensors: Find the two sensors mounted near the bottom of the garage door tracks, usually about 4–6 inches above the floor. One is the sender (emits the beam), and the other is the receiver (detects it).
- Inspect for obstructions: Remove any dirt, dust, or objects blocking the sensors. A quick wipe with a soft cloth can often solve the problem.
- Loosen the mounting screws: Using a screwdriver, gently loosen the screws on each sensor so they can be adjusted but not removed.
- Align the sensors: Position each sensor so they face directly toward one another. Use a level or string line to ensure both are at the same height and aligned in a straight line.
- Tighten the screws: Once the sensors are properly aligned, carefully tighten the screws to hold them in place. Make sure not to overtighten, as this could shift the alignment again.
- Restore power and test: Turn the power back on and test your garage door. If aligned correctly, the door should close smoothly when nothing is in its path and reverse if the beam is interrupted.

Garage Door Sensor Troubleshooting Tips
Even after carefully aligning your garage door sensors, you may still encounter occasional issues. Here’s how to troubleshoot common problems to keep your door operating safely:
- Check the sensor lights: Most sensors have LED indicators. A steady light usually means proper alignment, while a blinking or dim light can indicate a misalignment, obstruction, or wiring issue.
- Clean the sensors: Dirt, dust, or cobwebs can block the sensor beam. Wipe the lenses gently with a soft cloth to ensure a clear path.
- Verify alignment: Double-check that both sensors are facing each other straight on and are at the same height. Even a slight tilt can cause malfunctions.
- Inspect mounting hardware: Over time, screws or brackets can loosen. Ensure the sensors are securely fastened and stable.
- Examine wiring connections: Loose or damaged wires can disrupt the signal between sensors and the opener. Make sure all connections are secure.
If these steps don’t resolve the issue, the problem may be a faulty sensor or electrical component, which may require professional service. Regular garage door maintenance and periodic checks help ensure your garage door sensors continue to operate safely and reliably.
Garage Door Sensor Maintenance and Safety Tips
Keeping your garage door sensors aligned and functioning properly is essential for safety and smooth operation. Here are some key tips and best practices to help you maintain your system:
- Test sensors regularly: Check your garage door sensors at least once a month. Place an object in the door’s path to ensure it reverses correctly.
- Keep sensors clean: Dust, dirt, and cobwebs can interfere with the sensor beam. Wipe them with a soft, dry cloth regularly.
- Check alignment after bumps or vibrations: Accidental bumps from lawn equipment, vehicles, or even strong door movements can knock sensors slightly out of alignment. Recheck and adjust as needed.
- Inspect wiring periodically: Look for frayed or loose wires and secure them to prevent electrical issues.
- Avoid obstruction near the sensors: Keep toys, tools, and other items away from the sensor area to prevent false triggers.
- Schedule professional maintenance: A yearly inspection by a qualified garage door technician can catch issues early and extend the life of your system.
By following these simple safety and maintenance practices, you’ll ensure your garage door operates reliably, keeping your family and property safe.
When to Hire a Professional for Garage Door Sensor Issues
While many garage door sensor issues can be resolved with simple alignment and cleaning, some situations require professional expertise. You should contact a garage door technician if you encounter:
- Persistent sensor problems: If the door still won’t close or the sensors continue to malfunction after multiple attempts at alignment and cleaning.
- Faulty wiring or electrical issues: Exposed, frayed, or damaged wires may pose a safety risk and require professional repair.
- Broken or damaged sensors: Cracked or otherwise malfunctioning sensors cannot be safely fixed at home and need replacement.
- Door not responding properly: If the garage door behaves unpredictably despite aligned sensors, the opener or mechanical components may need inspection.
- Safety concerns: Anytime you notice that the door could pose a risk to people, pets, or property, it’s best to call a trained professional.
Professional garage door technicians have the tools and experience to safely diagnose and repair complex issues, ensuring your door operates reliably and your home remains secure.

Keep Your Garage Door Safe with Professional Repair and Maintenance
Properly aligned garage door sensors are essential for the safety and smooth operation of your garage door, but even with careful maintenance, issues can still arise. Regular professional inspections and maintenance help prevent unexpected problems, extend the life of your door, and ensure that your sensors and opener function correctly every time.
At Aladdin Doors, our experienced technicians provide expert garage door opener repair, sensor alignment, and full maintenance services. Whether your sensors need a quick adjustment, your opener requires repair, or you want a comprehensive check-up, we ensure your garage door operates safely and reliably.
Don’t wait for a malfunction to put your family at risk. Contact Aladdin Doors today to schedule professional garage door repair and maintenance and enjoy peace of mind knowing your garage door is in expert hands.
Frequently Asked Questions (FAQs)
Should both garage door sensors be green?
Most modern sensors have indicator lights, and typically one light (the receiver) will glow steady green when properly aligned. Some models may show green on both sensors or a combination of green and amber. A blinking light usually signals misalignment, obstruction, or wiring issues. Always refer to your opener’s manual for exact light behavior.
Why is my garage door sensor blinking?
A blinking sensor light usually indicates that the beam between the sensors is interrupted or misaligned. It can also be caused by dirt, dust, cobwebs, loose wiring, or a faulty sensor. Start by cleaning the sensors, checking alignment, and ensuring all wiring is secure.
How do I know if my garage door sensor is bad or just misaligned?
If the door won’t close even when the sensors are clean, aligned, and securely mounted, the sensor may be defective. Signs of a bad sensor include cracked or damaged casing, inconsistent LED lights, or failure to detect obstructions even after alignment. If in doubt, testing with a replacement sensor or calling a professional can confirm the issue.
What direction should garage door sensors face?
Garage door sensors should face directly toward each other across the door opening, with the emitter pointing at the receiver. Both sensors should be mounted at the same height, usually 4–6 inches above the floor and aligned in a straight horizontal line to ensure the infrared beam is uninterrupted.
How far apart should garage door sensors be?
Garage door sensors are typically installed on opposite sides of the door track, directly across from one another. The distance depends on the width of your garage door opening, but the sensors should always face each other squarely so the beam can travel straight across without obstruction.